Exposition, idekCTF
Exposition - Idek CTF 2025 Writeup
Challenge Overview
Challenge Name: Exposition
CTF: Idek CTF 2025
Category: Mobile/React Native
The challenge presented us with a React Native application consisting of a simple physics-based interface. Users could input text that would spawn as colored rectangles in a physics simulation area, where these rectangles could move and collide with each other.
Initial Analysis
Application Interface
The app features a minimal interface with:
- A large physics simulation area (gray background with blue dotted border)
- An input field at the bottom with the instruction “Type text and press enter to create floating blocks!”
- When text is entered, it creates colored rectangular blocks that can move and interact within the simulation area
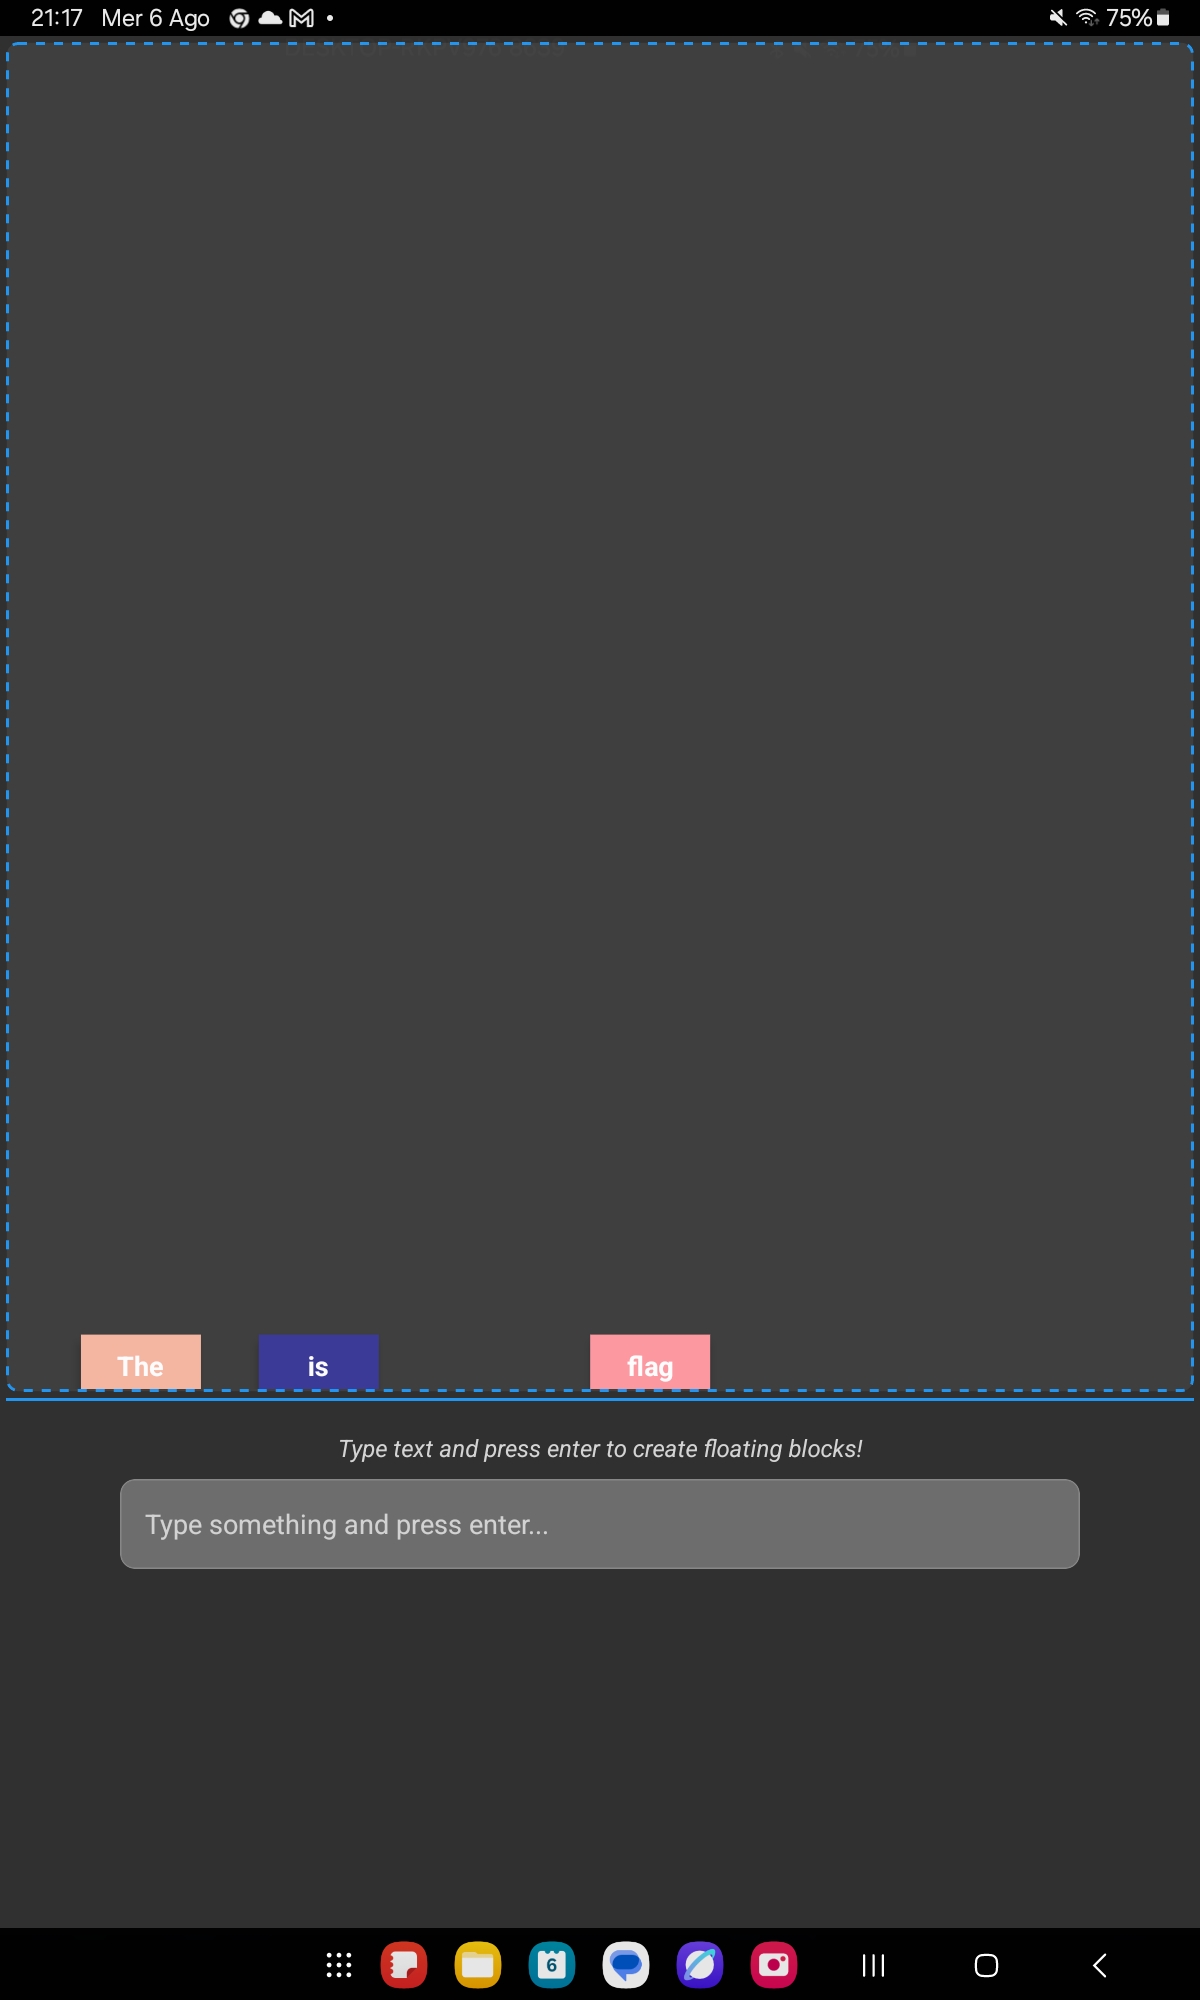
The application showing three blocks created from inputs “The”, “is”, and “flag”
First Steps - Static Analysis
Since only an APK file was provided, I began with static analysis using JADX to decompile the application.
The first important file I examined was com.exposition.MainApplication:
package com.exposition;
import android.app.Application;
import android.content.Context;
import com.facebook.react.PackageList;
import com.facebook.react.ReactApplication;
import com.facebook.react.ReactHost;
import com.facebook.react.ReactNativeApplicationEntryPoint;
import com.facebook.react.ReactNativeHost;
import com.facebook.react.ReactPackage;
import com.facebook.react.defaults.DefaultReactHost;
import com.facebook.react.defaults.DefaultReactNativeHost;
// ... [truncated for brevity]

public final class MainApplication extends Application implements ReactApplication {
    private final ReactNativeHost reactNativeHost = new DefaultReactNativeHost(this) {
        private final boolean isHermesEnabled;
        private final boolean isNewArchEnabled;

        @Override
        public boolean getUseDeveloperSupport() {
            return false;
        }

        // ... additional React Native configuration
    };

    @Override
    public void onCreate() {
        super.onCreate();
        ReactNativeApplicationEntryPoint.loadReactNative(this);
    }
}
This confirmed that we were dealing with a React Native application, as evidenced by:
- Multiple imports from
com.facebook.reactpackages - Implementation of
ReactApplicationinterface - References to React Native components like
ReactNativeHostandReactPackage
Deep Dive - React Native Reverse Engineering
Learning About React Native Architecture
Since I had never reversed a React Native application before, I started researching the architecture and reverse engineering techniques specific to this framework.
I discovered a very helpful blog post: Reverse Engineering and Instrumenting React Native Apps
Locating the JavaScript Bundle
Following the guide, I found that the React Native code was contained in:
resources/assets/index.android.bundle
However, when I tried to examine this file, I encountered an obstacle:
feld@feld-ZenBook:~/Documents/ctf/idek2025/exposition/attachments/app-jadx/resources/assets$ file index.android.bundle
index.android.bundle: Hermes JavaScript bytecode, version 96
The file wasn’t plain JavaScript as I expected, but rather Hermes JavaScript bytecode - a specific bytecode format used by React Native applications when the Hermes JavaScript engine is enabled (which we had confirmed from the MainApplication code: isHermesEnabled = true).
The Hermes Challenge
This presented a significant challenge because Hermes bytecode is not human-readable like regular JavaScript. The bytecode is a compiled, optimized format that requires special tools to decompile back into readable JavaScript.
Decompiling Hermes Bytecode
More research led me to discover hermes-dec, a decompiler specifically designed for Hermes JavaScript bytecode. This tool can convert the bytecode back into readable JavaScript.
I used the decompiler on the bundle:
hbc-decompiler assets/index.android.bundle output.js
The decompilation was successful, but it produced a massive JavaScript file. React Native bundles typically contain not just the application code, but also the entire React Native framework, third-party libraries, and all dependencies bundled together into a single file.
Analyzing the Decompiled Output
With the decompiled JavaScript in hand, I now faced the challenge of finding the relevant application code within thousands of lines of framework and library code.
The decompiled file was massive - over 200,000 lines of heavily obfuscated JavaScript.
Finding the Application Logic
To locate the relevant code, I used a simple but effective technique: searching for strings visible in the UI.
I searched for the text "Type something and press enter" which was visible in the app interface, and this led me to find the core application logic.
Here’s the relevant section I discovered:
r17 = _closure1_slot5;
r18 = r17.TextInput;
r17 = {};
r24 = _closure1_slot10;
r24 = r24.inputBox;
r17['style'] = r24;
r24 = 'Type something and press enter...';
r17['placeholder'] = r24;
r17['value'] = r23;
r17['onChangeText'] = r22;
[...]
The next ~1000 lines contain the main application code.
The Flag Validation Logic
More importantly, I found what appeared to be flag validation code. The decompiled JavaScript contained several key elements:
- Flag Format Validation: The code checks for the standard CTF flag format:
- Must start with
'idek{' - Must end with
'}' - The content between must match a specific pattern:
/^[a-zA-Z0-9_]{61}$/
- Must start with
- Flag Structure: The validation revealed the flag structure:
- Total length: 61 characters (excluding the
idek{and}wrapper) - Position 16 must be
'_' - Position 33 must be
'_' - This creates a three-part structure:
PART1_PART2_PART3 - Part 1: 16 characters (positions 0-15)
- Part 2: 16 characters (positions 17-32)
- Part 3: 27 characters (positions 34-60)
- Total length: 61 characters (excluding the
- Three Validation Functions: The code contained three separate validation methods, one for each part of the flag:
- 1: Validates the first 16 characters
- 2: Validates the middle 16 characters
- 3: Validates the final 27 characters
- Trigger Condition: There’s special logic that activates when the last three text blocks created spell out
['The', 'flag', 'is']in that exact order
Reverse Engineering the Flag Parts
Now came the challenging part: understanding how each of the three validation functions worked and what they expected as input.
Part 1: The Date-Hash-XOR Challenge
The first part of the flag (16 characters) used a particularly interesting validation approach:
r10 = r10.toString;
r1 = 10;
r10 = r10.bind(r6)(r1);
r6 = r10.padStart;
r5 = 2;
r1 = '0';
r10 = r6.bind(r10)(r5, r1);
// ... more date manipulation ...
r11 = r2.Date;
r1 = '2025-';
r12 = r1 + r10;
r1 = '-';
r1 = r12 + r1;
r19 = r1 + r10;
// Creates date string like "2025-00-00"
r10 = r11.prototype;
r10 = Object.create(r10, {constructor: {value: r11}});
r20 = r10;
r1 = new r20[r11](r19, r18);
r10 = r1 instanceof Object ? r1 : r10;
r1 = r10.toISOString;
r1 = r1.bind(r10)();
r10 = r6.bind(r9)(r1);
The validation works as follows:
- Date Object Creation: A JavaScript Date object is created with the string
"2025-00-00"- which is technically invalid but JavaScript handles it gracefully - Date Normalization: The invalid date gets normalized to
"2024-11-30T00:00:00.000Z"whentoISOString()is called (JavaScript date handling can be quite quirky) - SHA-256 Hashing: This normalized date string gets hashed with SHA-256
- XOR Validation: The first part of the input flag is XORed against a hardcoded key
- Comparison: If the XOR result matches the SHA-256 hash, the first part passes validation
The relevant XOR validation code:
r1 = [207, 143, 244, 109, 98, 219, 179, 20, 93, 64, 118, 3, 154, 106, 77, 248, 135, 143, 226, 26, 102, 102, 88, 231, 123, 239, 122, 77, 46, 235, 13, 227];
// ... XOR operations with this hardcoded key
r6 = r8.charCodeAt;
r6 = r6.bind(r8)(r2);
r4 = _closure6_slot1;
r4 = r4[r7];
r4 = r6 ^ r4;
r1 = r5 === r4;
Inverting Part 1 Validation
This validation was straightforward to reverse since it’s a simple XOR operation. I wrote a Python script to invert the process:
import hashlib
from pwn import xor

key = [207, 143, 244, 109, 98, 219, 179, 20, 93, 64, 118, 3, 154, 106, 77, 248, 135, 143, 226, 26, 102, 102, 88, 231, 123, 239, 122, 77, 46, 235, 13, 227]
xor_key = bytes(key)
print("xor_key", xor_key)

date_iso = "2024-11-30T00:00:00.000Z"
sha256_hash = hashlib.sha256(date_iso.encode()).digest()
date_iso_hashs = sha256_hash
print("-----")

xored = xor(date_iso_hashs, xor_key)
print(f"xored\t {xored}")

part = ''
for i in range(0, len(xored), 2):
    part += chr(xored[i])
print(part)
print(part[::-1])
This gave me the first 16 characters of the flag.
Part 2: The Lights Out Game Challenge
The second part of the flag validation was much more creative - it implemented a Lights Out puzzle game!
The relevant JavaScript code initialized two 8×8 grids:
r3 = new Array(33);
r1 = [2, 2];
r3[0] = r1;
r1 = [4, 0];
r3[1] = r1;
r1 = [2, 5];
r3[2] = r1;
// ... more grid initialization coordinates ...

r14 = new Array(36);
r1 = [7, 4];
r14[0] = r1;
r1 = [2, 6];
r14[1] = r1;
// ... second grid coordinates ...
The validation works as follows:
- Grid Setup: Two 8×8 grids are initialized with specific positions set to 1, others to 0
- Lights Out Rules: Each “move” flips a cell and its orthogonal neighbors (up, down, left, right)
- Goal: Find the sequence of moves that makes all cells in the grid equal to 0
- Flag Encoding: The solution pattern encodes the flag characters - each row of moves represents one byte/character
Solving the Lights Out Puzzle
This is essentially a linear algebra problem over GF(2) (binary field). I used Gaussian elimination to solve it:
import numpy as np

def index(r, c):
    return r * 8 + c

def neighbors(r, c):
    for dr, dc in [(0,0), (-1,0), (1,0), (0,-1), (0,1)]:
        nr, nc = r + dr, c + dc
        if 0 <= nr < 8 and 0 <= nc < 8:
            yield index(nr, nc)

# Build the effect matrix A
A = np.zeros((64, 64), dtype=np.uint8)
for r in range(8):
    for c in range(8):
        i = index(r, c)
        for j in neighbors(r, c):
            A[j, i] = 1  # column i = effect of clicking position i

# Initial state (first grid)
grid = [
    [1,0,0,1,1,0,1,0],
    [1,0,0,1,0,1,1,1],
    [1,1,1,0,0,1,0,0],
    [1,1,0,0,1,0,1,0],
    [1,0,0,0,0,0,0,1],
    [1,0,1,1,1,1,1,1],
    [1,0,1,0,1,0,0,1],
    [1,0,1,0,0,0,0,1]
]

b = np.array([bit for row in grid for bit in row], dtype=np.uint8)

# Gaussian elimination mod 2
def gauss_mod2(A, b):
    A = A.copy()
    b = b.copy()
    n = len(b)

    for col in range(n):
        pivot = None
        for row in range(col, n):
            if A[row, col]:
                pivot = row
                break

        if pivot is None:
            continue  # null column

        if pivot != col:
            A[[col, pivot]] = A[[pivot, col]]
            b[[col, pivot]] = b[[pivot, col]]

        for row in range(n):
            if row != col and A[row, col]:
                A[row] ^= A[col]
                b[row] ^= b[col]

    return b

solution = gauss_mod2(A, b)

# Convert solution to characters
for r in range(8):
    number = int(''.join(str(solution[index(r, c)]) for c in range(8)), 2)
    print(chr(number), end='')
By changing the initial grid matrix, this same script could solve for the second set of 8 characters in Part 2.
Part 3: RC4 Cryptography with Physics Parameters
The final part of the flag (27 characters) used RC4 encryption - the encryption key was derived from the physics simulation parameters used by the app!
Looking at the JavaScript code, I found the relevant section:
r7 = _closure2_slot8;
r7 = r7.current;
r19 = r7.gravity;
r7 = _closure2_slot8;
r7 = r7.current;
r18 = r7.airResistance;
r7 = _closure2_slot8;
r7 = r7.current;
r17 = r7.bounceDamping;
r7 = _closure2_slot8;
r7 = r7.current;
r16 = r7.collisionDamping;
r6 = _closure2_slot8;
r6 = r6.current;
r15 = r6.zeroClampThreshold;
r6 = r2.HermesInternal;
r7 = r6.concat;
r20 = '';
r10 = r20[r7](r19, r18, r17, r16, r15, r14);
And the ciphertext comparison:
r3 = function(a0, a1) { // Environment: r3
    r1 = [134, 145, 231, 193, 40, 196, 78, 177, 206, 34, 168, 148, 66, 43, 66, 136, 194, 158, 195, 255, 243, 123, 190, 218, 173, 28, 3];
    r0 = a1;
    r1 = r1[r0];
    r0 = a0;
    r0 = r0 === r1;
    return r0;
};
The validation works by:
- Key Generation: Concatenating physics parameters: gravity + airResistance + bounceDamping + collisionDamping + zeroClampThreshold
- RC4 Encryption: Using the concatenated string as the RC4 key
- Comparison: The input flag part is encrypted and compared against the hardcoded ciphertext array
Solving the RC4 Challenge
I implemented an RC4 decryption function and used the physics parameters as the key:
def rc4_decrypt(ciphertext, key):
    """
    Standard RC4 implementation for decryption
    """
    # Key Scheduling Algorithm (KSA)
    S = list(range(256))
    j = 0
    for i in range(256):
        j = (j + S[i] + key[i % len(key)]) % 256
        S[i], S[j] = S[j], S[i]

    # Pseudo-Random Generation Algorithm (PRGA)
    i = j = 0
    plaintext = []
    for byte in ciphertext:
        i = (i + 1) % 256
        j = (j + S[i]) % 256
        S[i], S[j] = S[j], S[i]
        keystream_byte = S[(S[i] + S[j]) % 256]
        plaintext_byte = byte ^ keystream_byte
        plaintext.append(plaintext_byte)

    return bytes(plaintext)

# Physics parameters from the app
gravity = 0.15
airResistance = 0.996
bounceDamping = 0.7
collisionDamping = 0.8
zeroClampThreshold = 0.005

# Build key by concatenating parameters (as done by HermesInternal.concat)
key_string = f"{gravity}{airResistance}{bounceDamping}{collisionDamping}{zeroClampThreshold}"
print(f"Key string: {key_string}")

# Encode key (as done by TextEncoder in JavaScript)
key_bytes = key_string.encode('utf-8')
print(f"Key bytes: {key_bytes}")

# Hardcoded ciphertext from JavaScript
ciphertext = [134, 145, 231, 193, 40, 196, 78, 177, 206, 34, 168, 148, 66, 43, 66, 136, 194, 158, 195, 255, 243, 123, 190, 218, 173, 28, 3]

# Decrypt
try:
    decrypted = rc4_decrypt(ciphertext, key_bytes)
    print(f"Decrypted as string: {decrypted.decode('utf-8', errors='ignore')}")
except Exception as e:
    print(f"Error during decryption: {e}")
This approach successfully revealed the final 27 characters of the flag by reversing the RC4 encryption using the physics parameters as the decryption key.
Solution
Combining all three parts, the complete flag was:
idek{d3spit3_th3_nam3_No_Expo_was_Used_in_the_cr34t10n_of_7hi5_4pp}
The flag itself is a clever reference to the challenge name “Exposition” - despite the name, no actual Expo (React Native development framework) was used in creating the app!
Lessons Learned
This challenge was an excellent introduction to React Native reverse engineering and taught several valuable techniques:
Technical Skills Gained
Hermes Bytecode Analysis: Learning to identify and decompile Hermes JavaScript bytecode using tools like hermes-dec
JavaScript Quirks
A fun side discovery was JavaScript’s bizarre date handling behavior. The invalid date "2025-00-00" automatically normalizing to "2024-11-30T00:00:00.000Z" is exactly the kind of quirk that makes JavaScript both fascinating and frustrating. There’s actually a hilarious quiz about JavaScript date oddities that demonstrates just how unpredictable the Date object can be!
Flag
idek{d3spit3_th3_nam3_No_Expo_was_Used_in_the_cr34t10n_of_7hi5_4pp}